前回の導入編につづいて、iOSのビルド作業ができるところまでやってみます!
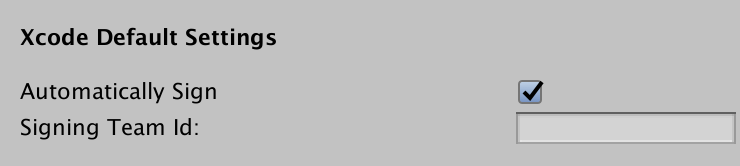
(今回はArchiveまでを行ってみます。IPA出力は今回は割愛します。) また、この記事では事前にUnity側でTeam IDを設定していることを想定しています。 (Developer Programに入っている必要があります)
下記のSigning Team Idにわすれず入力しておきましょう
さて、通常はUnity上でiOSビルドを行いますが、CIではそのようなことができないのでUnityをbatchmodeで起動して
ビルド実行用のメソッドを叩けるようにしておく必要があります。
下記クラスをAssets/EditorにBatchBuild.csを作成しておきましょう。
Assets/Editorでなくても良いですが、必ずEditorディレクトリ配下に作成しておきます。
あ、Unityのプロジェクトはgithubに存在している想定です。
using UnityEngine;
using UnityEditor;
using System.IO;
using System.Linq;
using System.Collections;

public static class BatchBuild
{
    // 出力先
    private const string OutputDir = "Builds/";

    // 生成名
    private const string Android = "out.apk";
    private const string IOS = "XcodeProject";

    private static BuildOptions buildOptions = BuildOptions.Development;

    [MenuItem("Build Android")]
    private static void BuildAndroid()
    {
        var scenes = EditorBuildSettings.scenes.Where(s => s.enabled).Select(s => s.path).ToArray();

        string path = GetOutputPath();
        if (!Directory.Exists(path))
        {
            Directory.CreateDirectory(path);
        }

        // 出力用のファイルを定義
        var outputFile = path + Android;
        if (File.Exists(outputFile))
        {
            File.Delete(outputFile);
        }

        var target = BuildTarget.Android;
        BuildPipeline.BuildPlayer(scenes, outputFile, target, buildOptions);
    }

    [MenuItem("Build iOS")]
    private static void BuildiOS()
    {
        var scenes = EditorBuildSettings.scenes.Where(s => s.enabled).Select(s => s.path).ToArray();

        string path = GetOutputPath();

        if (!Directory.Exists(path))
        {
            Directory.CreateDirectory(path);
        }

        // 出力用のフォルダを設定
        var outputFile = path + IOS;
        if (Directory.Exists(outputFile))
        {
            Directory.Delete(outputFile, true);
        }

        var target = BuildTarget.iOS;
        BuildPipeline.BuildPlayer(scenes, outputFile, target, buildOptions);
    }

    private static string GetOutputPath()
    {
        string projectDir = Application.dataPath + "/../";
        string path = Path.GetFullPath(projectDir);
        path += OutputDir;
        return path;
    }
}
次にパイプラインに設定するための構成をyamlファイルで作成します。
動作的には、resourcesで指定したリポジトリのmasterブランチが更新されたらjobが起動するようになっています。
ビルドしたいプロジェクト自体は別の場所でcloneしてあり、そちらを使い回すような想定にしています。
Unityのプロジェクト自体はサイズ大きくなることが多くcloneやSwitch Platformにも時間がかかると思われるためです。
そんなことない、という場合はInputを設定すればOKです。
ファイル名はbuild_unity.ymlとしておきます。
resources:
  - name: Unity-Project
    type: git
    source:
      uri: Githubのリポジトリのアドレス # https://github.com/shamaton/hoge.git
   branch: master

jobs:
  - name: build-unity
    plan:
      - get: Unity-Project
        trigger: true
      - task: let_us_build
        config:
        platform: darwin
        run:
          path: sh
          args:
          - -c
          - |
            cd path/to/project
            git pull
            /Applications/Unity/Unity.app/Contents/MacOS/Unity -batchmode -quit -projectPath . -executeMethod BatchBuild.BuildiOS -logFile /dev/stdout
            cd ./Builds/XcodeProject
         xcodebuild -configuration Release archive </code></pre>
ファイルが作成できたら、導入編でいれたflyコマンドを使って登録しましょう。
fly -t sample login -c http://localhost:8080/ fly -t sample set-pipeline -p build_unity -c build_unity.yml
Apply configuration?と聞かれるのでyを選択します。 これで、Webを見てみるとbuild_unityが追加されてるはずなので、pausedの横にある再生マークをおして動くようにしておきます。

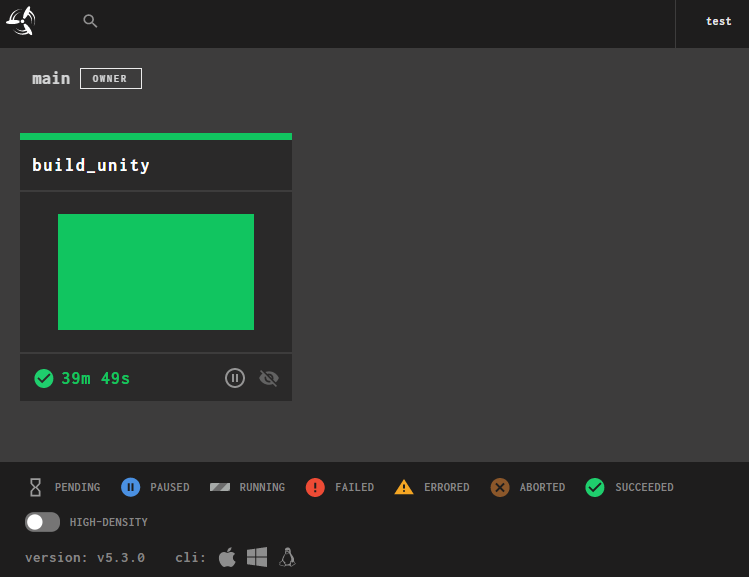
さらにbuild_unityをクリックすると詳細が見れるので、右上にあるプラスボタンを実行するとpipelineが動き出します。
もしどこかで失敗してしまう場合はビルドしているコマンドをローカルで実行してみてください。
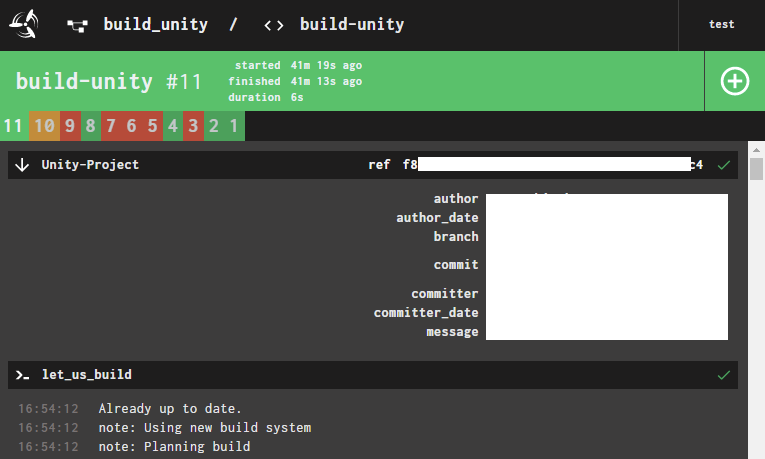
今回の場合は最後に ARCHIVE SUCCESSED と出ればうまく動作した状態になります。

IPA出力までやりたいんじゃ!という方はこちらなどを参照いただけると….!
concourseで素敵なUnity CIライフが過ごせると良いですね…!
以上です。
■ 参考 コンテナ側を使ったテストもやってみたのでyamlを載せておきます。
<pre class="wp-block-preformatted">resources:
- name: msgpack
type: git
icon: github-circle
source:
uri: https://github.com/shamaton/msgpack.git
- name: golang-1.12.x-image
type: registry-image
icon: docker
source:
repository: golang
tag: 1.12-stretch
task-config: &task-config
platform: linux
inputs:
- name: msgpack
path: /go/src/github.com/shamaton/msgpack
run:
path: /bin/sh
args:
- -c
- |
SRCPATH=$PWD/go/src/github.com/shamaton/msgpack
GOPATH=$PWD/go
cd $SRCPATH
go get -t -v ./...
go test -v ./...
jobs:
- name: golang-1.12
public: true
plan:
- get: msgpack
trigger: true
- get: golang-1.12.x-image
trigger: true
- task: run-tests
image: golang-1.12.x-image
config:
<< : *task-config